Welcome to the Unreal Tournament Guides
As a long time fan of Unreal Tournament games i have acquired a bit of knowledge of running servers through time for especially the more recent Unreal Tournament 4 on the Unreal Engine 4 for which a lot of thanks also goes out to Metalfist, MoxNix, Supsun and some others.
If you want to learn how to run a Dedicated Server and/or a Hub for Unreal Tournament 4 you have come to the right place!
It can be quite hard to find what you're looking for and/or meet the right people who have time and are willing to teach you things.
I hope you will find the information here useful and that it helps you properly enough to set up something for your Community for example and get it going.
I've compiled some information about running a server or a hub for Unreal Tournament 4 and will share it on this page here :)
If you find this information useful, it has helped you enough, and you have a few bucks to spare you are more than welcome to donate some money in any currency to me by visiting this link: paypal.me/Allnoobs
The money i receive will be used to pay for the website, redirect hosting, gameservers and licenses we have running which cost money on a monthly basis. Thanks a lot for considering a donation :)
If you need more help or can't figure something out then feel free to join our Discord area by clicking this discord link.
This page lists all the prerequisites required for running the server or hub for Unreal Tournament 4. Make sure you install each one of them or your server/hub will not function.
| Link | Description |
|---|---|
| Dedicated Server | The dedicated server package for Unreal Tournament 4, make sure you logged in with your account on Epic Games. If you do not already have an account you should create one at EpicGames.com |
| VC++ 2013 | Visual C++ Redistributable Packages for Visual Studio 2013 The Visual C++ Redistributable Packages install run-time components that are required to run C++ applications that are built by using Visual Studio 2013. |
| VC++ 2015 | Visual C++ Redistributable for Visual Studio 2015 The Visual C++ Redistributable Packages install run-time components that are required to run C++ applications built using Visual Studio 2015. |
| DirectX | DirectX End-User Runtime Web Installer The Microsoft DirectX End-User Runtime provides updates to 9.0c and previous versions of DirectX — the core Windows technology that drives high-speed multimedia and games on the PC. |
Please make sure you UnBlock the download for the dedicated server before you extract it or your server or hub will not function correctly in many cases.
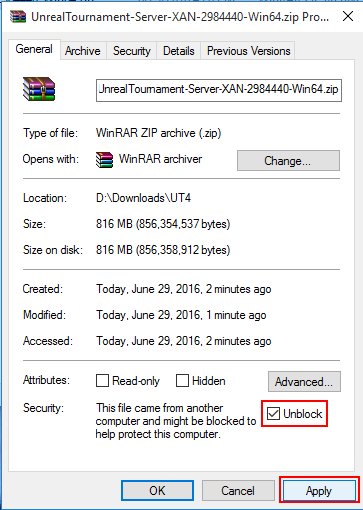
To unblock the .zip file, right click on it and choose "Properties":
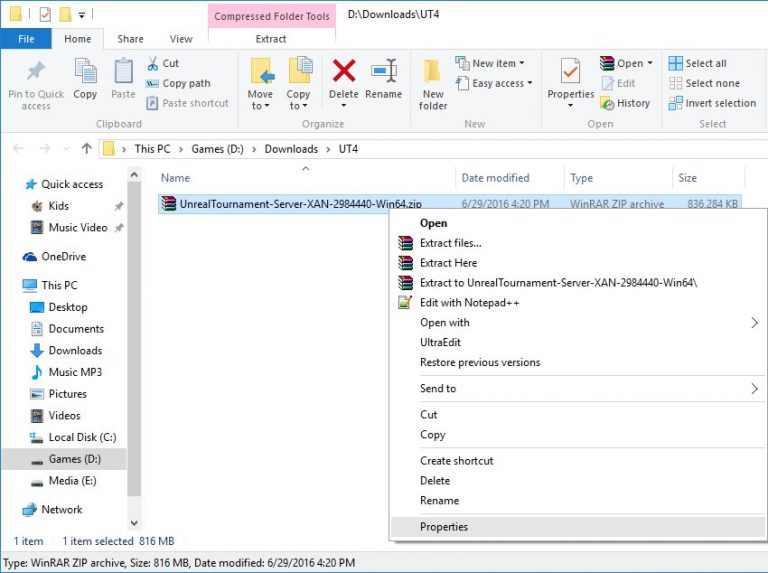 There at the bottom right click the checkbox "Unblock" and "Apply" it. Now you can extract the .zip file anywhere you like!
 If you need more help or can't figure something out then feel free to join our Discord area by clicking this discord link.
Configure a Dedicated Server
Install the zip files
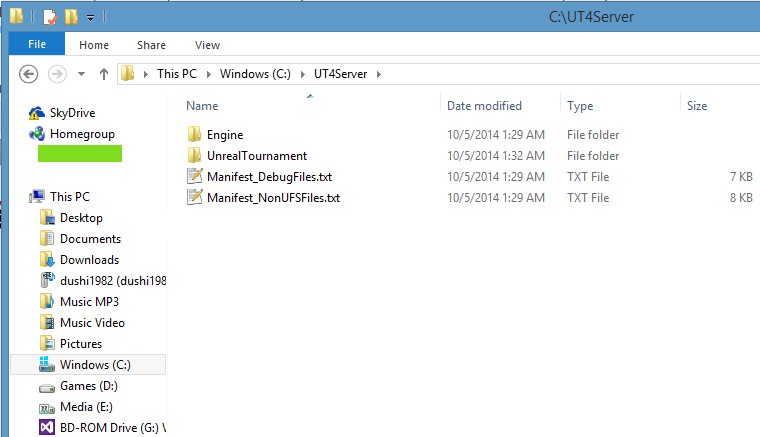
Create a folder called UT4Server somewhere (in this example i use C:\UT4Server\).
Extract the contents of the WindowsServer folder inside the UT4 Server .zip file into your C:\UT4Server\ folder.
You should end up with something like this:
Batchfile to Start
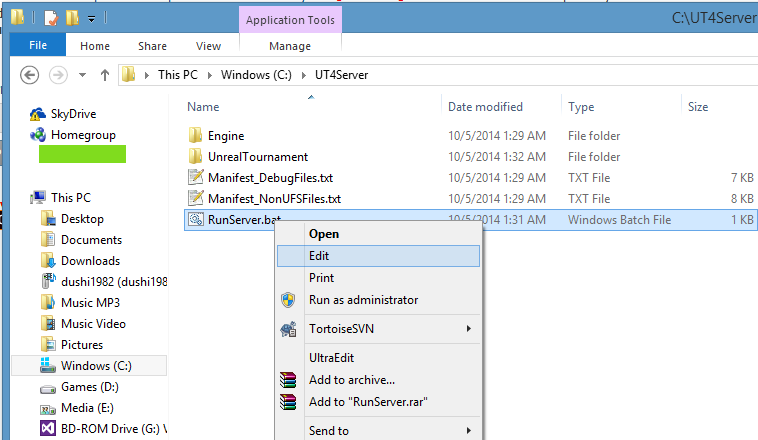
Create a file called "RunServer.bat" inside your UT4Server folder.
Put the text from below inside your RunServer.bat file with notepad. Make sure you replace the "-multihome=192.168.178.17" to match your own IP.
cd Engine\Binaries\Win64
start UE4Server-Win64-Shipping.exe UnrealTournament DM-Spacer?Game=DM?MaxPlayers=16 -multihome=192.168.178.17 -port=7777 -log
(Some networked PC's don't need the multihome directive, simply remove it if your server isn't working and try again, or make absolutely sure you are binding it to the correct (internal) IP.)
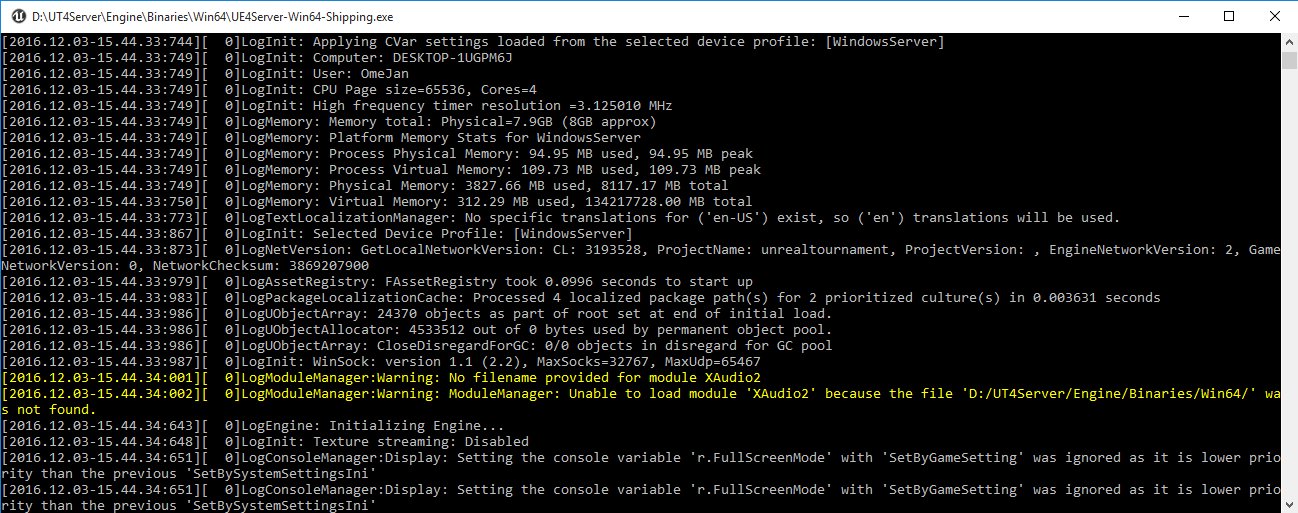
First Testrun
Now startup the server by double clicking on the RunServer.bat file.
Note that the server will close itself after the first initial run, this is because during the first run it creates configuration files.
You will end up with a screen simular to this:
Edit Server Title and MOTD
Now goto your "C:\UT4Server\UnrealTournament\Saved\Config\WindowsServer" and open the Game.ini that is there, now you can adjust your Server Title and MOTD by editing the following lines:
[/Script/UnrealTournament.UTGameState]
ServerName=AllNoobs.com NL
ServerMOTD=Community Server
ServerDescription=Where Frags Happen A Lot...
Run your server
Now you can run your server and it will show the title, motd, discussed in here and people should be able to join your server.
If not: You likely need to configure your firewall or router to allow access, see your manual or google.
Make sure you forward or unblock the ports 7777 UDP, 7787 UDP and 14000 UDP.
If you need more help or can't figure something out then feel free to join our Discord area by clicking this discord link.
Install the zip files
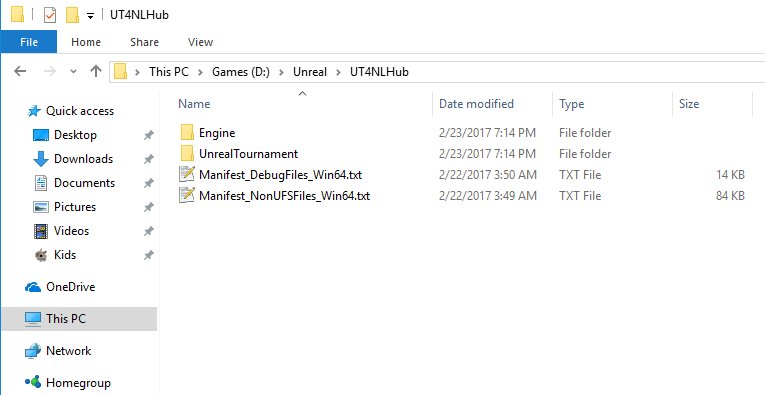
Create a folder called UT4Hub somewhere (in this example i use D:\Unreal\UT4NLHub\).
Extract the contents of the WindowsServer folder inside the UT4 Server .zip file for example into your D:\Unreal\UT4NLHub\ folder.
You should end up with something like this (paths may differ if you choose another destination):
Firedaemon Service
With Firedaemon you can install services to run and restart automatically when they go down/crash.
This is useful for the UT4 Hubs as well because a Hub (believe it or not) normally quits after 3 hours of inactivity.
Installing a service with Firedaemon to monitor the Hub will ensure it boots back up when this happens.
Firedaemon is a free program and you can download it off our website @ FireDaemon-Lite-1_5_1
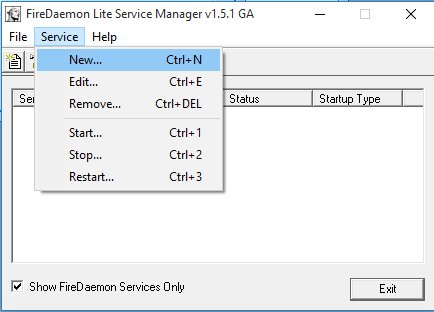
Creating a new Service with Firedaemon
Note: You may need to run Firedaemon with Administrator privileges if it fails to install the service.
Goto Service->New...
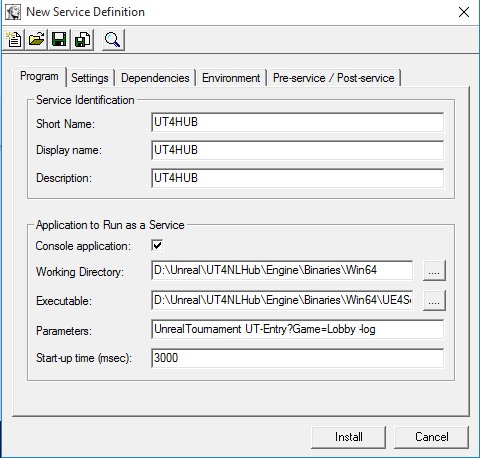
Now we need to enter a few things on the Program tab, just follow the image, (it uses the example folder at D:\Unreal\UT4NLHub\)
Service Identification
Short Name: UT4HUB
Display Name: UT4HUB
Description: UT4HUB
Application to Run as a Service
Console application -> Ticked
Working Directory: D:\Unreal\UT4NLHub\Engine\Binaries\Win64
Executable: D:\Unreal\UT4NLHub\Engine\Binaries\Win64\UE4Server-Win64-Shipping.exe
Parameters: UnrealTournament UT-Entry?Game=Lobby -log
Start-up time (msec): 3000
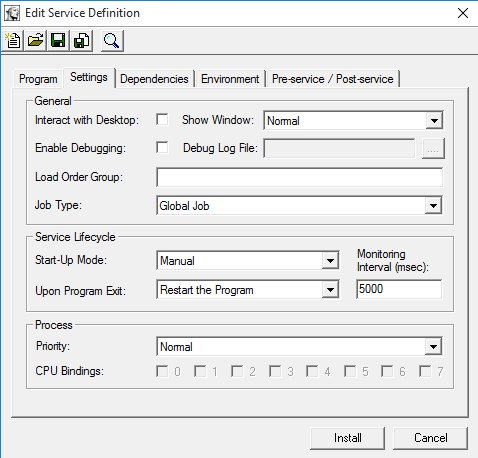
Next tab we configure the Settings:
General
Interact with Desktop -> UnTicked
Service Lifecycle
Start-Up Mode: Manual
The rest default settings are fine.
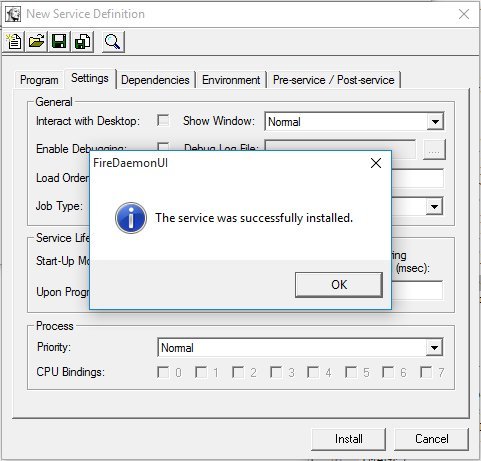
 Now press "Install" and you should get this confirmation:
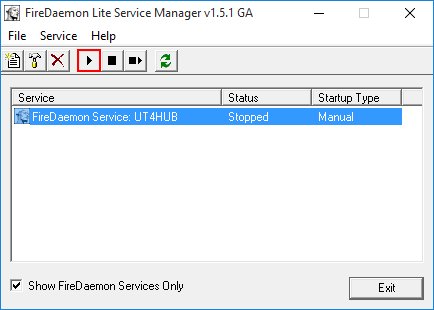
 First HUB Testrun
Run the HUB and let it fully load by selecting the service in the window and clicking on the black > play button
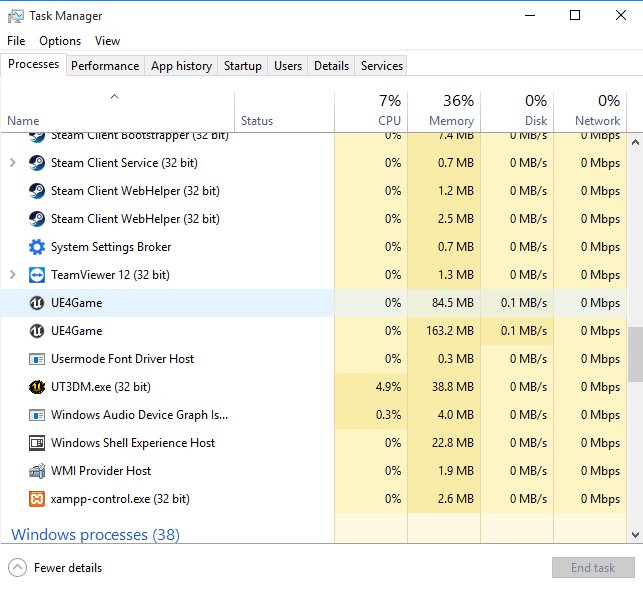
 You mostlikely cannot see the HUB running on your taskbar. It IS running however, go check your taskmanager!
 Configuration of the HUB
The HUB created several files in your "D:\Unreal\UT4NLHub\UnrealTournament\Saved\Config\WindowsServer" folder:
 Run your Hub
You should now be able to run your Hub, join it and create games and play standard games.
If you want to run custom content and settings see the Game.ini and Rulesets.json examples below.
Example Game.ini
Here's an example Game.ini to use. It also contains a sample redirectreference entry so you know how to use that as well.
[/Script/UnrealTournament.UTBaseGameMode]Rulesets JSON files
RedirectReferences=(PackageName="Mutator_AbsoluteHitSounds-WindowsNoEditor", PackageURLProtocol="https", PackageURL="redirect.allnoobs.com/ut4/users/BigDealdf4c/Mutator_AbsoluteHitSounds-WindowsNoEditor.pak", PackageChecksum="9d380557fa363ae211d71e898c38acd6")
[/Script/UnrealTournament.UTGameState]
ServerName=AllNoobs.com NL/Europe
ServerMOTD=WELCOME TO ALLNOOBS [NL]\n\n Check our custom maps selection! \n\n Replays activated!\n\n If you have any questions or want a map added then contact us on our Discord @ dc.allnoobs.com
ServerDescription=All Noobs Community
[/Script/UnrealTournament.UTLobbyGameMode]
LobbyPassword=
AutoLaunchGameMode=
AutoLaunchGameOptions=
AutoLaunchMap=
MinPlayersToStart=1
MaxPlayersInLobby=300
StartingInstancePort=25000
InstancePortStep=1
MaxInstances=10
[/Script/UnrealTournament.UTGameMode]
bRecordReplays=true
bHandleDedicatedServerReplays=true
MapVoteTime=60
There is now a special command to get the rulesets available for the hub:
ExportGameRulesets rulesets.jsonTo export the list open your game, and type that in the console, you can find the JSON file in your "Documents\UnrealTournament\Saved" folder then.
You can then modify this json file and place it in your "Saved/Config/Rulesets" folder for your Hub.
At the time of writing, 05/17/2017, the full JSON file will look like this: (right) click to download JSON file
If you need more help or can't figure something out then feel free to join our Discord area by clicking this discord link.
Set the RCON Password
Open the file: C:\UT4Server\UnrealTournament\Saved\Config\WindowsServer\Engine.ini
And edit the following section:
[/Script/UnrealTournament.UTGameEngine]Replace PASSWORDHERE with a password you want for RCON.
bFirstRun=False
RconPassword=PASSWORDHERE
RCON Commands
Here some RCON commands you can use:
AllAmmo
AddBots [# of bots]
ChangeTeam
Ghost
HudSettings
KillBots
Loaded
Open [Map Name]
RestartLevel
RconAuth [Password]
RconExec [Command] (Commands such as: allammo, killbots, ghost, etc.)
RconMap [Map name]
RconNextMap [Map name]
RconKick
Stat FPS
SwitchTeam
Suicide
UnlimitedAmmo
ViewPlayer [Name]
ViewSelf
Walk
Set Maximum player wait time in Warmup Mode
Set the option called ?MaxPlayerWait=x in your commandline in the batchfile to set a manual wait time for warmup mode where x is in seconds.
Useful if you don't want a wait time or a very short one so people can start playing faster.
Set Maximum ready wait time
Use ?MaxReadyWait=xx for the instance to wait xx seconds for players to get ready before it's automatically set.
Force No Bots
With ?ForceNoBots=1 you force the server to not have bots at all, period.
Turn off Idle/AFK kick
Use ?IgnoreIdle=1 to turn off the automatic Idle/AFK kicker. Players will then no longer be kicked for being Idle/AFK too long.
Add bots to your server
To add bots to your server you enter a number for the parameter ?botfill=x
Where x is the number bots you want in the server.
Set a timelimit
To set a custom timelimit on your server you enter a number for the parameter ?TimeLimit=xx
Where xx is the number of minutes you want to play each map.
Password your server
To add a password to your server you enter password after the option called ?ServerPassword=xxx
Where xxx is the password you want in the server. Players will be asked to enter it before they can join.
Setting a custom tickrate
The server tickrate controls how often per second a client is updated with new data, though this increases accuracy it can also adversely affect server performance and cause lag on slower systems and netspeeds.
Goto your "C:\UT4Server\UnrealTournament\Saved\Config\WindowsServer" and open the config file called "Engine.ini" and add the following to it:
[/Script/OnlineSubsystemUtils.IpNetDriver]The maximum tickrate is 120, the default is 60.
NetServerMaxTickRate=90
Running Multiple Servers
If you wish to run multiple servers you need to copy the whole folder and then change an option in the server's Engine.ini else you get a port conflict.
Each server must run on its own so called "beacon port".
If you do not configure this then you get an error simular to the one below:
[2016.05.28-08.28.58:786][ 0]UT:Warning: Could not bind to expected beacon port. Restarting server!!! [7788 vs 7787]
Simply open the file Engine.ini in your "UnrealTournament\Saved\Config\WindowsServer" folder and add the following section:
[/Script/OnlineSubsystemUtils.OnlineBeaconHost]Configure ListenPort for each server to run on a different port and you're good to go.
ListenPort=7797
Extend Vote Time & Replays
Simply add the following section into your Game.ini to adjust values for Voting time and Replay handling:
[/Script/UnrealTournament.UTGameMode]
bRecordReplays=true
bHandleDedicatedServerReplays=true
MapVoteTime=60
If you need more help or can't figure something out then feel free to join our Discord area by clicking this discord link.
Custom Maps in UT4
I am going to use the map DM-Antalus-A6 for UT4 by Moxnix as example here, and can be downloaded (at the time of writing) from our redirect space at the following link:
https://redirect.allnoobs.com/ut4//users/zunnie79c6/DM-Antalus-A6-WindowsNoEditor.pak
Step 1:
First of all we need to place the downloaded file in the correct place on on our server.
In this example the server is located at "D:\Unreal\UT4NLServer\"
We need to place the file in the "Paks" folder, go into your server's "UnrealTournament\Content\Paks" folder and paste the file there:
 Step 2:
MD5 Checksum Program
Each file has a unique identifier called a MD5 Checksum, this is how UT4 checks if people have the same (unmodified) file and there are no inconsistencies.
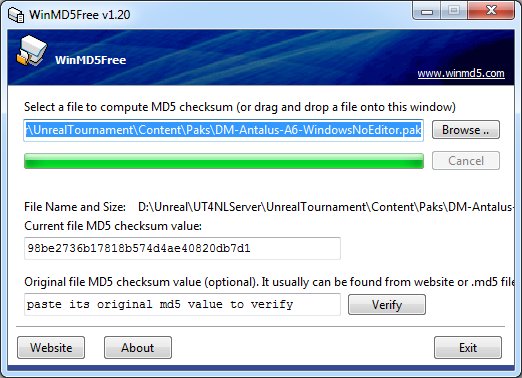
There is an easy utility available for free which is called "WinMD5", you can point this program to a file and calculate its MD5 Checksum quickly.
Download this program here: http://www.winmd5.com/
Step 3:
Calculate the MD5 Checksum
Simply run the WinMD5 program and Browse for the file to compute the MD5 for, in this case the file we copied to our Paks folder in Step 1 (at the time of writing this guide it is DM-Antalus-A6).
The endresult should look simular to this:
 Step 4:
Get Map Name & Path from a .pak file
Some maps contain a custom "URL" or "Path" in a .pak file which makes it a little difficult to load a map and add it to the Map Rotation of your server.
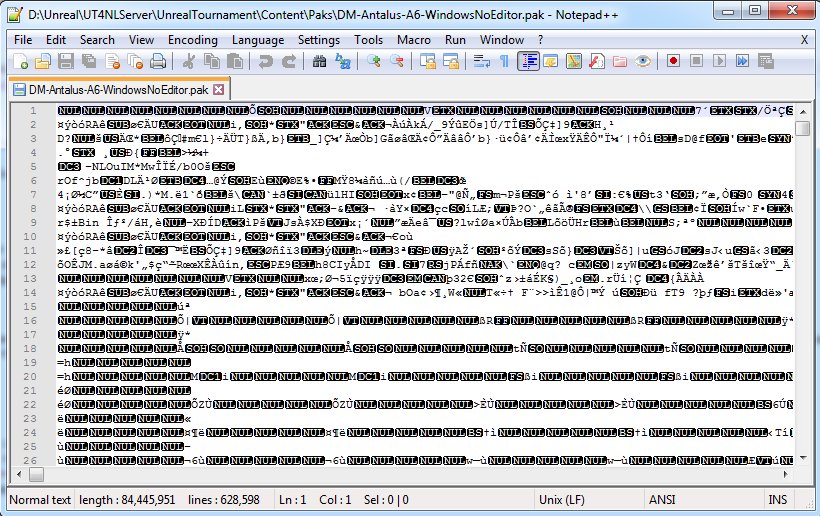
I personally recommend Notepad++ and it is the program i am using in this example to get the map "Path" from the .pak file.
You can download Notepad++ here: https://notepad-plus-plus.org/download/ and install it.
Goto your servers "Paks" folder and right click on the file and choose "Edit with Notepad++":
 Once you opened it with Notepad++ you will see a lot of gibberish characters, the important stuff is normal text however.
Here is what you should be seeing now:
 Press "Ctrl+F" or goto the menu option "Search->Find..." to search for text in the file.
What we need to look for is this phrase without quotes: ".umap"
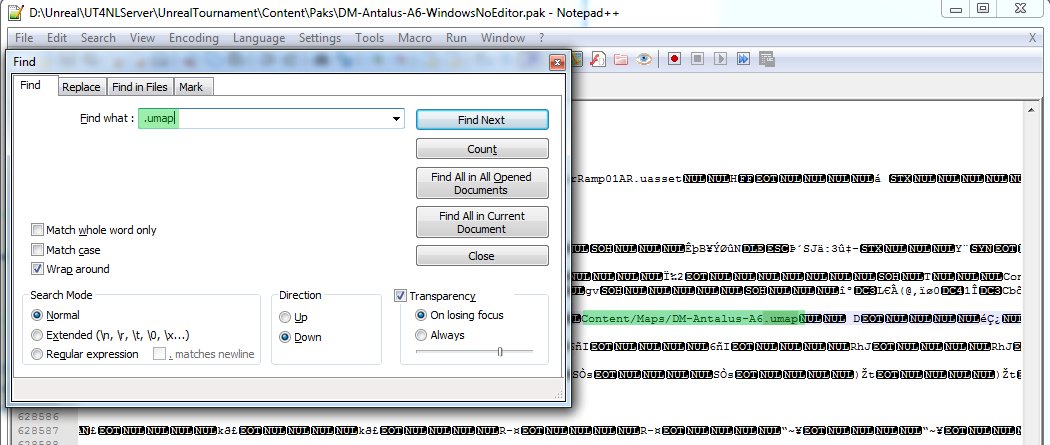 See the line with "Content/Maps/DM-Antalus-A6.umap"?
This line we need for our Game.ini, it tells us the map name to use in the Game.ini, for this particular map example it will be translated to:
MapRotation=/Game/Maps/DM-Antalus-A6Step 5:
Setup the Redirect Reference
A redirect reference tells the game where to get it from when players join the server.
For our current map example (DM-Antalus-A6) we need its MD5 Checksum from Step 3.
We also need the mapname aka "DM-Antalus-A6"
Now let's assemble the redirect reference itself for Game.ini, for this map we use the following:
RedirectReferences=(PackageName="DM-Antalus-A6-WindowsNoEditor",PackageURLProtocol="https",PackageURL="redirect.allnoobs.com/ut4/users/zunnie79c6/DM-Antalus-A6-WindowsNoEditor.pak",PackageChecksum="98be2736b17818b574d4ae40820db7d1")Make sure that is under the section called [/Script/UnrealTournament.UTBaseGameMode] in Game.ini
Highlighted in green is the example we added for the redirect reference and map path from the pak file
 Maps are loaded into the Vote Menu automatically now. If you run a Deathmatch or Team Deathmatch server, ALL maps prefixed with "DM" are loaded from your "Content\Paks" folder and placed into the Vote Menu.
Free Redirect
If you do not have a redirect space for your server yet, you can sign up for free at redirect.allnoobs.com/ut4/ which gives you 5000MB of space for maps and mutators for use in your redirectreferences.
If you need more help or can't figure something out then feel free to join our Discord area by clicking this discord link.
Since almost every build of Unreal Tournament 4 Pre-Alpha requires content such as Maps and Mutators to be re-cooked it is possible some download links are not working because of a recent update, if this is the case, stay tuned and wait for me to update this page with the new build downloads.
Absolute Elimination | Download
This is probably the most popular mutator out there for Hubs. It adds a gamemode where teams score a point at the end of a round when there is still a player alive.
Configuration
To enable Elimination you have to add the following section into your rulesets.json file:
{Example Elimination JSON file
"uniqueTag": "ELIMINATION",
"title": "Elimination",
"categories": [ "Featured", "Elimination" ],
"tooltip": "The team with players left alive at the end of a round scores a point.",
"description": "Survive, and kill the other team!\n\nFirst team to 10 points wins.\n Hitsounds ON.",
"displayTexture": "Texture2D'/Game/RestrictedAssets/UI/GameModeBadges/GB_TDM.GB_TDM'",
"gameMode": "/Game/ALTS/Elimination_113.Elimination_113_C",
"bHideFromUI": false,
"bCompetitiveMatch": false,
"bTeamGame": true,
"maxPlayers": 10,
"minPlayersToStart": 1,
"gameOptions": "?BotFill=0?ForceNoBots=1?MaxPlayerWait=45?SaveDebugRoundData=1?GoalScore=10?TimeLimit=0?SecondsPerRound=90?MaxSpectators=10?BalanceTeams=True?mutator=AbsoluteHitSounds",
"optionFlags": 65535,
"maxMapsInList": 0,
"mapPrefixes": [ ],
"defaultMap": [ ],
"requiredPackages": [ ],
"customMapList": ["/Game/RestrictedAssets/Maps/WIP/DM-ASDF","/Game/RestrictedAssets/Maps/WIP/DM-Cannon","/Game/RestrictedAssets/Maps/WIP/DM-Deadfall","/Game/RestrictedAssets/Maps/WIP/DM-DeckTest","/Game/RestrictedAssets/Maps/WIP/DM-Focus","/Game/EpicInternal/Lea/DM-Lea","/Game/RestrictedAssets/Maps/WIP/DM-NickTest1","/Game/RestrictedAssets/Maps/WIP/DM-RGB","/Game/RestrictedAssets/Maps/WIP/DM-Sand","/Game/RestrictedAssets/Maps/WIP/DM-SidCastle","/Game/RestrictedAssets/Maps/WIP/DM-Solo","/Game/RestrictedAssets/Maps/WIP/DM-Spacer","/Game/RestrictedAssets/Maps/WIP/DM-Temple","/Game/RestrictedAssets/Maps/DM-Underland","/Game/RestrictedAssets/Maps/WIP/DM-Vortex",]
}
Here is an example JSON file with all of the standard settings from Epic Games including Elimination tab: (right) click to download example elimination ruleset file
You can then modify this json file and place it in your "Saved/Config/Rulesets" folder for your Hub to enable Elimination with your own settings.
Absolute Hit Sounds | Download
This mutator adds extra sound effects for the hit-sound when you are firing your weapon to enemies.
?mutator=/Game/AbsoluteHitSounds/Mutator_AbsoluteHitSounds.Mutator_AbsoluteHitSounds_C
Can't Join or Connect?
A common mistake on Windows platforms is that the executable isn't allowed to accept incoming or outgoing connections.
You have to manually add it to the Windows firewall sometimes, which i'll explain how to do here.
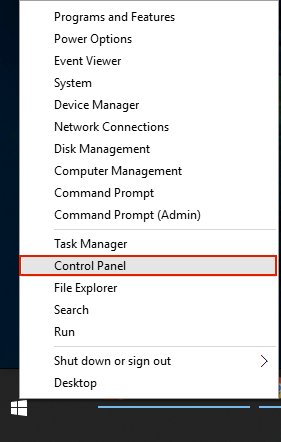
In this example i am using Windows 10 Professional x64, the procedure is the same on most Windows platforms but may be a tad different for other versions.
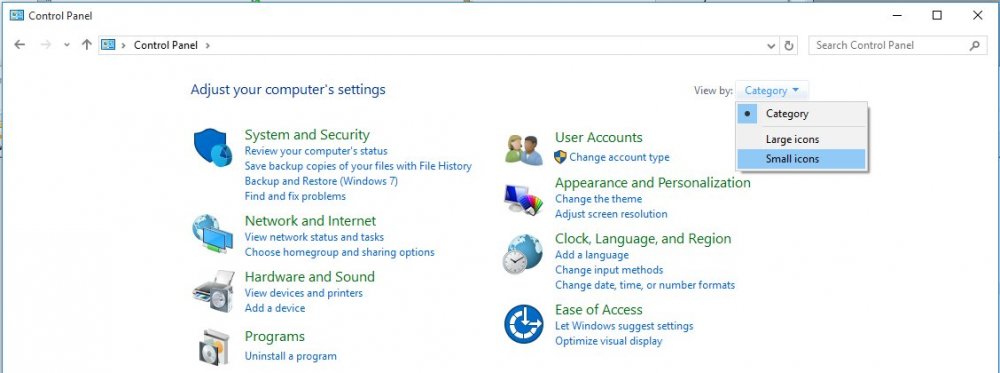
Right click on your Startmenu icon and choose "Control Panel"
 Once the Control Panel is opened, enable the "View by" to show Small icons by clicking on that menu at the top right:
 Now click on the Windows Firewall
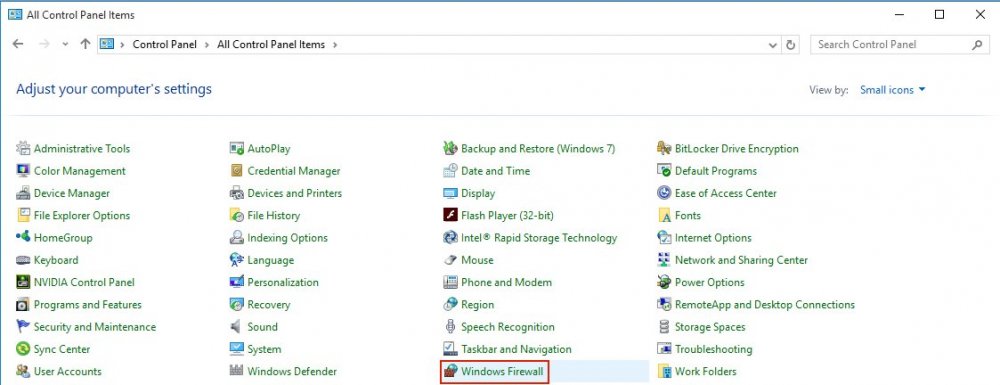 Goto the Advanced settings:
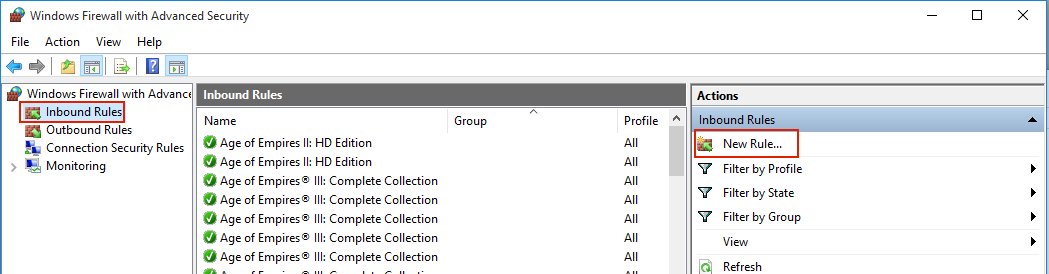
 On the window that popped up left click on the "Inbound Rules" at the left.
Next left click on the "New Rule..."
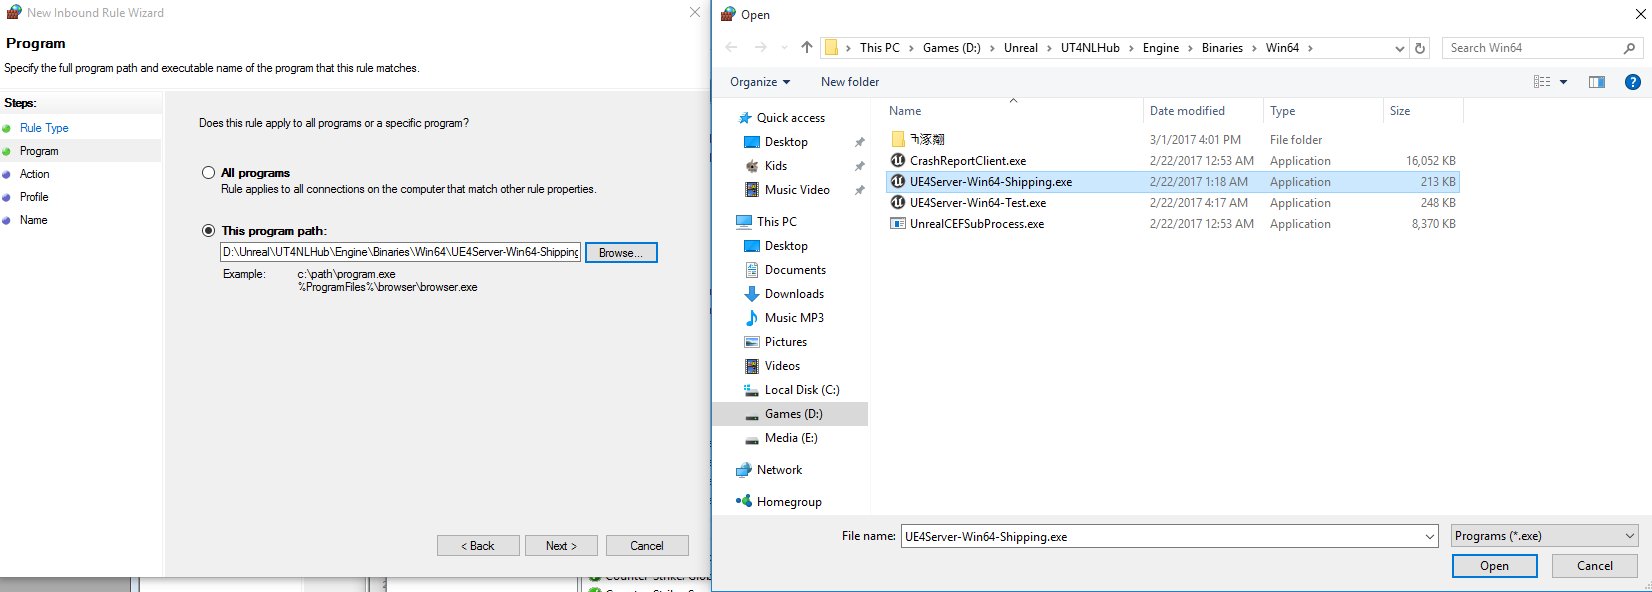
 Choose "Program" and click Next.
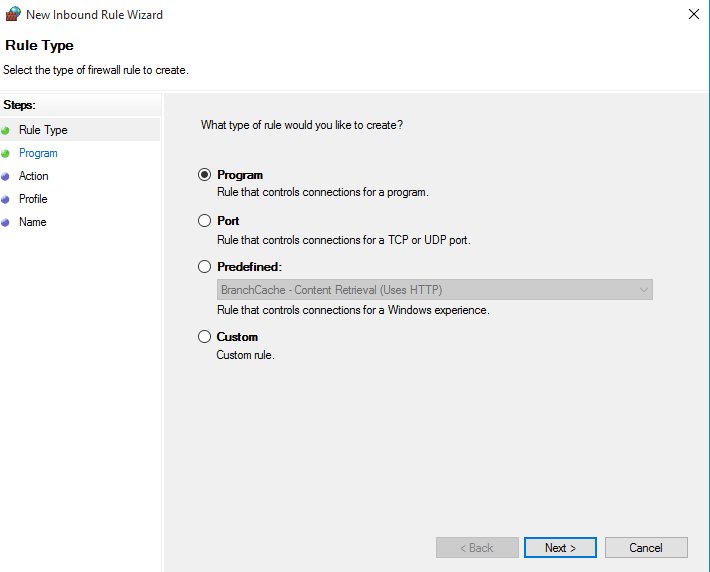 Click "Browse..." button to find the executable to add, it is the "UE4Server-Win64-Shipping.exe" found in the "Engine\Binaries\Win64\" folder where at the location where you choose to unzip the server files.
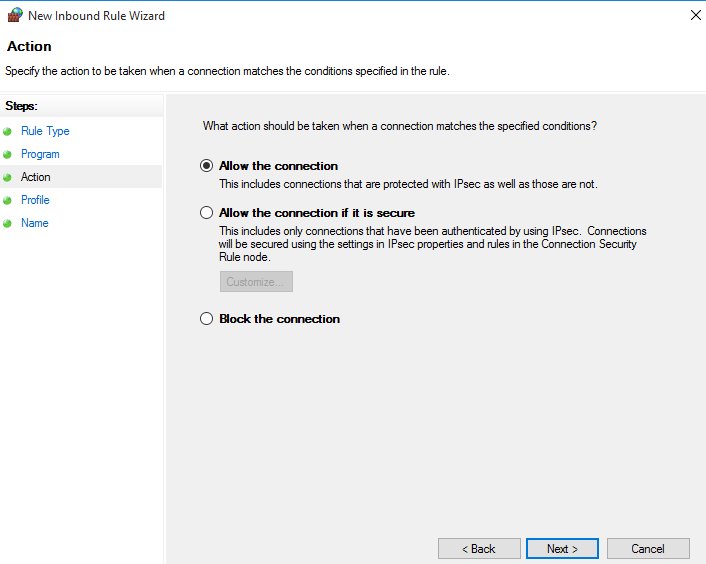
 "Allow the connection" should be selected and click Next
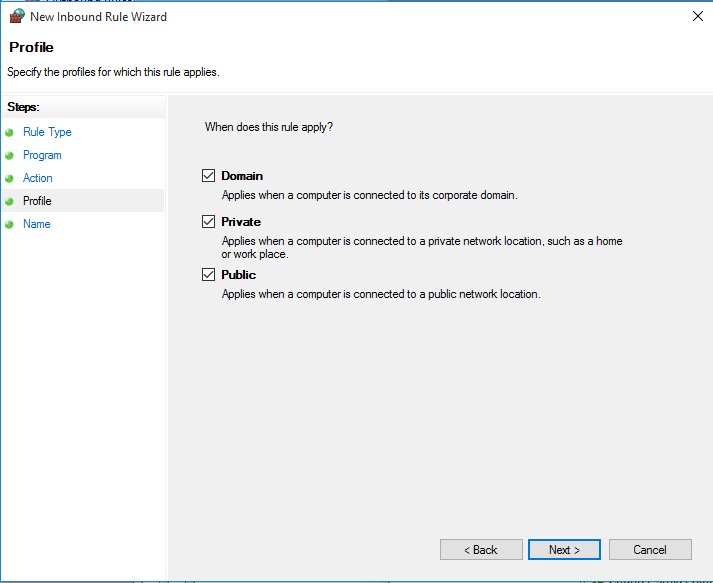
 On the next screen the default settings are fine, just click Next
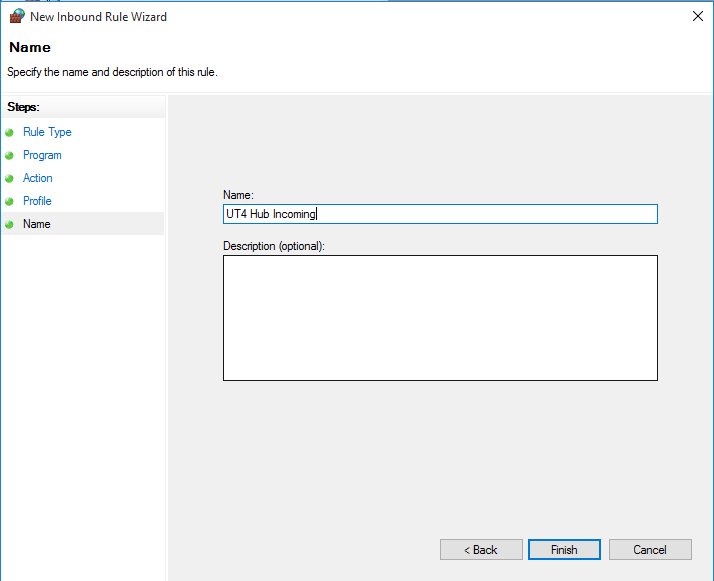
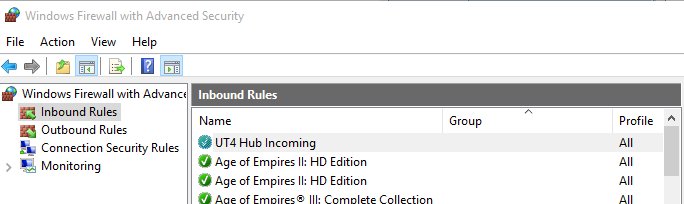
 Name it for example UT4 Hub Incoming and click Finish
 Endresult should look simular to this
 Repeat Process
Now we need to repeat the above process but for "Outbound Rules". Make sure you "Allow the connection" for it and name it like "UT4 Hub Outgoing"
This should enable your Hub or Server to handle both incoming and outgoing connections.
Forward your Ports
Still cannot Join or Create Games in your server or Hub?
Make sure you open/forward these ports in your router to your internal LAN IP for the PC running your Hub or Server:
7777 UDP
25000 to 25011 UDP (if you use the Game.ini example for Hubs)
7787 UDP
14000 UDP
If you need more help or can't figure something out then feel free to join our Discord area by clicking this discord link.